

File system errors are the problems related to hard disk or Windows system, such as bad sectors and corrupted Windows files. There are kinds of file system errors you may see, like file system error (-2147219196), indicating Windows 10 preventing you from opening a photo App.
Table of Contents
What Are Reasons for File System Errors
Causes for file system errors are various. You may check factors below to know why you come across file system errors in Windows 10.
- Virus and malware infection may cause file system errors, even lagging computer and data loss.
- Sudden power failure or system crash during file operations can bring many issues, like file system errors.
- Unsafe removal of external storage device, especially when it is working.
- Bad sectors on the hard drive.
- Software malfunction.
- …
Except for the file system errors with code, what symptoms mean file system errors? Actually, when you receive file name or format not recognized, file refusing to open, file disappearing and blue screen of death, you may prepare to fix file system errors to avoid bigger issues.
How to Check and Fix File System Errors in Windows 10
File system errors can be solved by CHKDSK (short for Check Disk) command sometimes. It’s a tool to check file system integrity and find bad sectors on your hard disk.
However, CHKDSK is not prefect as it would make things worse if you use it improperly. Therefore, it is necessary to make a data backup of the target disk to ensure data safety. Then, you can follow the methods below to fix file system errors on your Windows 10.
Fix 1 – Run CHKDSK with Command Prompt
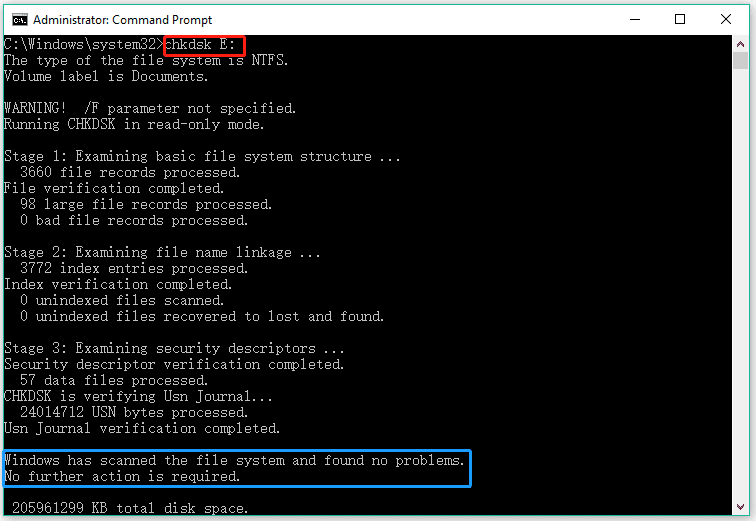
Step 1: Search cmd in Windows search box. Choose run Command Prompt as administrator.
Step 2: In Prompt window, type this command: chkdsk E: and press Enter imaging E drive is the target drive.
Step 3: Wait until the command finishes. If there are file system errors found, please continue typing the command: chkdsk /f E: and press Enter.
Fix 2 – Run CHKDSK from Device Properties Window
It is very simple to run CHKDSK command from the drive properties window to check for file system errors, even though you are inexperienced. Here’s how to do that:
Step 1: Open File Explorer and check whether the target drive is visible.
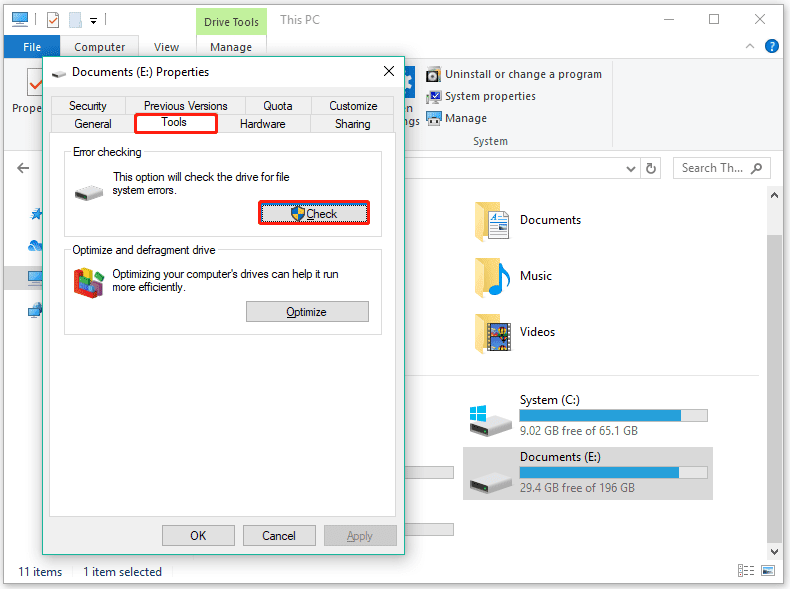
Step 2: Right click it and choose Properties from the menu.
Step 3: In Properties window, shift to Tools tab.
Step 4: Click Check under Error checking.
Step 5: Wait for a moment until the scanning process ends. If no errors found, just exit the window. If you are informed there are errors detected, you may click Repair drive to begin fixing the errors.
Actually, for Windows 10, this tool scans disk periodically, but you can still scan and repair manually.
Fix 3 – Run CHKDSK with MiniTool Partition Wizard
In addition to Windows inbuilt disk check tools, you can also use third ways to check and fix file system errors. You may try MiniTool Partition Wizard, which is a reliable disk manager for Windows users.
This is a brief introduction on how to scan and fix file system errors with Partition Wizard.
Step 1: Open MiniTool Partition Wizard and reach the main interface.
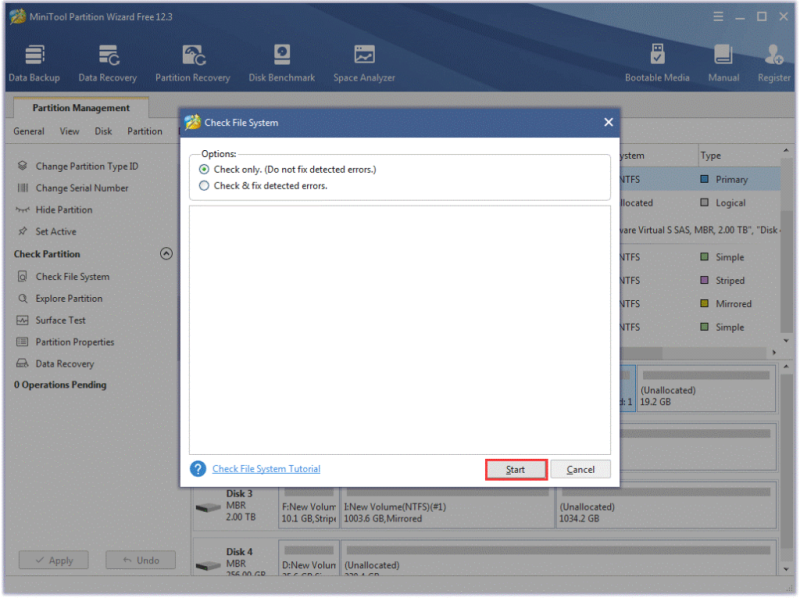
Step 2: Click the target drive in disk map, and then, click Check File System on the left pane.
Step 3: In new interface, click Check only or Check & fix detected errors based on your needs.
Step 4: Click Start button to start the task.
Fix 4 – Reset Windows Store Cache
Step 1: Run dialog by pressing Windows + R keys together.
Step 2: Type Wsreset.exe in it and press Enter.
Step 3: When the process completes, restart your computer to check if the error has gone.
Conclusion
That’s all for the introduction about file system errors and proven ways to check and fix them in Windows 10. Now, you can choose a suitable one according to your actual case. Please don’t hesitate to share with us if you have good ideas about it by commenting in the section below. Thanks!

Thank you for sharing Blog. Really helpful tips your experience and knowledge, it is very helpful. Thank you and good luck with the upcoming Blog. We are also providing Managed IT service.