Printer is a piece of common equipment in our workplace. But sometimes, it would be a frustrating problem if it can’t be connected to computer. I guess many users encountered this issue resulting from various reasons. Today, I’ll share some tips on how to solve printer not connected in Windows 10.
Before taking any technical measures, you’d better try following easy methods to restore the printer back to work.
① Restart computer. This should be the first action when any issues related to computer or hardware happens.
② Restart printer. Also, reboot the printer can solve some basic errors.
③ Check if there’s something wrong with the internet connection when using printer.
However, if the printer still remains unconnected after trying these methods, you can just move on to the following part to get to know more solutions provided by MiniTool Software.
Table of Contents
Useful Solutions to Printer Not Connected in Windows 10
1. Check the Hardware Connection
In general, the printer is connected to computer via a USB cable. So, let’s check the USB cable to ensure it is undamaged, and connects correctly and firmly. Then, check the USB port. If something inside the port may prevent the USB cable from connecting.
2. Troubleshoot Printer Issue
If your printer runs into some problems, it may not be connected to your Windows 10 normally. In this circumstance, you can run troubleshooting to detect and fix these errors. Just follow these steps:
Step 1: Enter control panel in Windows Search bar. Choose the best match and open it.
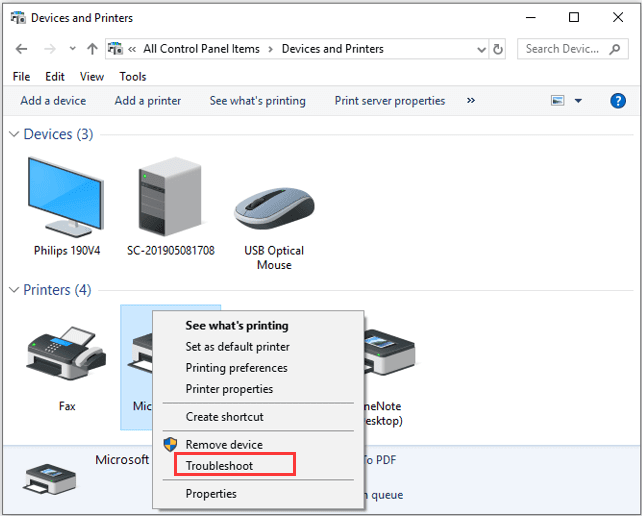
Step 2: Find and open Devices and Printers.
Step 3: Right click the target printer and choose Troubleshoot option. If you can’t see the target printer, check if it is displayed as Unspecified.
Step 4: This utility will diagnose issues automatically. If there are some fixes provided, please do it according to on-screen instructions.
3. Update Computer System
Updating Windows to the latest version can deal with many computer issues. It’s reported that some users have succeeded in fixing printer not connected with this method. So, just feel free to have a try.
Step 1: Just go to Windows Settings > Update & Security > Windows Update > Check for update (in the right pane).
Step 2: If there is available update, please download and install it.
After finishing updating Windows 10 to the latest version, you can restart and reconnect the printer to see whether the issue has been removed. Just go on check the next fix if it still exists.
4. Update Printer Driver
Outdated printer driver also should be blamed if printer can’t be connected on your Windows 10 computer. Thus, updating the printer driver to the latest version is another workable resolution.
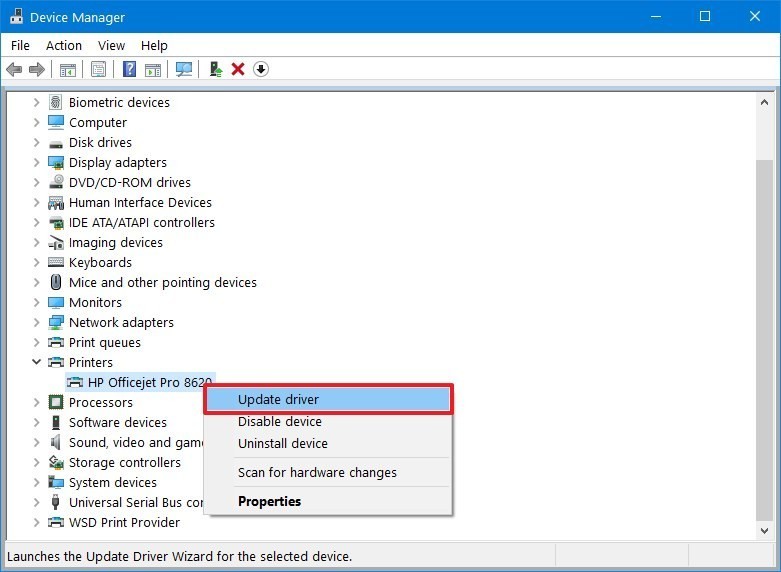
Step 1: Right click the Start icon. Click Device Manager.
Step 2: Expand the Print queues category to find the target driver. Right click it and choose Update driver.
Step 3: Find and choose the option Search automatically for updated driver software. And then follow the on-screen instructions to finish the update.
After that, restart your computer and check if the issue still appears.
5. Restart Print Spooler Service
The Print Spooler service error may lead to printer not connected to computer issue. When you encounter this case, just try restarting the service and remove the related files.
This is a guide to follow:
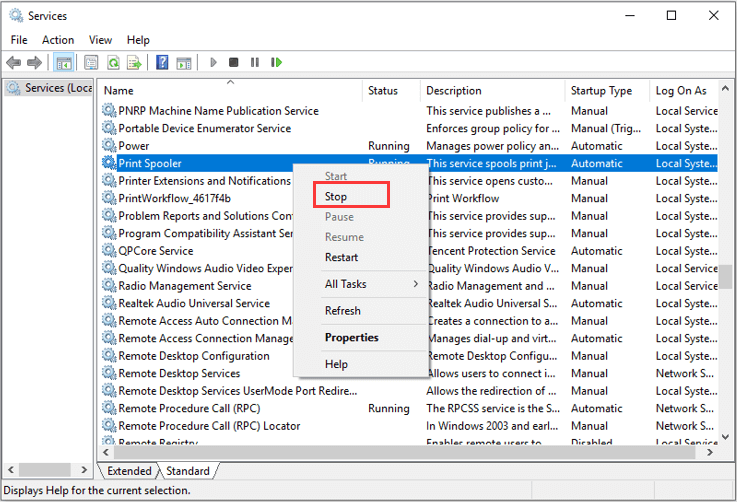
Step 1: Open Run dialog by pressing Windows + R buttons. Enter services.msc and click OK to launch Services app.
Step 2: Find the Print Spooler service. Right click it and hit Stop.
Step 3: Open Run window again and enter %WINDIR%\system32\spool\printers. Press Enter to go to the printer folder with administrator permission. Delete all the items in this folder.
Step 4: Return to the Services app. Double click the Print Spooler service.
Step 5: Go to General tab, and then click Start to enable it again.
Step 6: Click Automatic from the list of Startup type. Finally, click Apply and OK to execute.
6. Configure Printer Settings
Another reason for this issue may be your computer has regarded the printer used most recently as the default one at current location. So, try turning off the settings to get rid of this issue.
Step 1: Go to settings by pressing Windows + I.
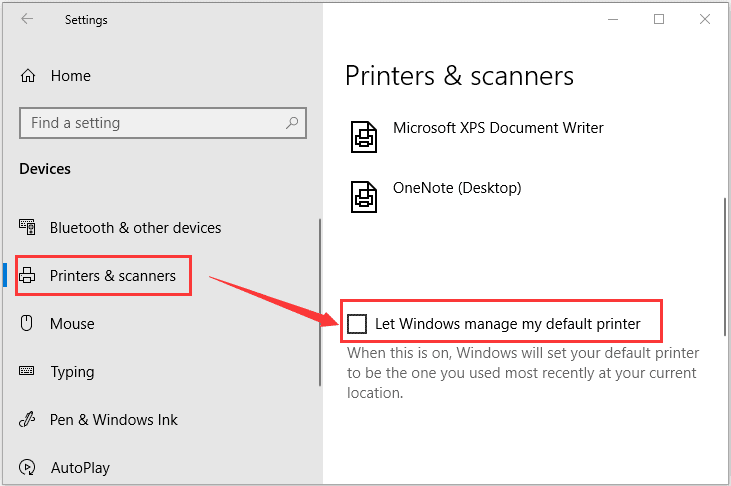
Step 2: Open Devices category. Choose Printers & Scanners on the left side.
Step 3: In the right pane, Uncheck the option Let Windows manage my default printer on the right side.
7. Check Compatibility of Printer and Windows 10
Step 1: Right click Start icon and choose Control Panel.
Step 2: Click Hardware and Sound > Devices and Printers.
Step 3: You can see many devices listed. Go Unspecified section to check if the printer is displayed.
You need to know some printers may be not compatible with Windows, or the functions are limited altogether. So, please make sure your printer is not in this category.
Conclusion
Do you get these methods to fix printer not connected in Windows 10? Now, just try them to solve this issue. Hope they will work for you.
Please feel free to share with us your experience or suggestions by leaving a comment below.