
Do you rely on a desktop computer to do your work?
There are various benefits of working on a desktop rather than a laptop. For starters, the memory storage of a desktop is significantly more than laptops. Additionally, its processors are more powerful, and its screen is larger. For certain professions, such characteristics are ideal for effective working.
But, there is one thing a laptop does right that usually a desktop computer can’t do. And that is carrying your work wherever you go. This is perfectly aligned with the demand for remote working.
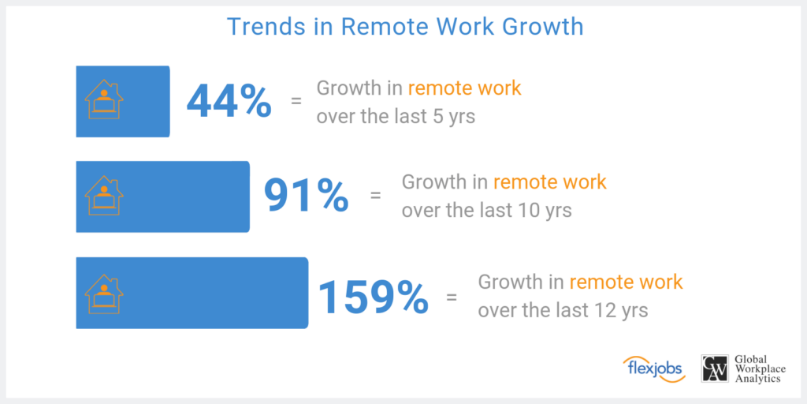
Remote working itself is gaining quite a lot of traction. According to Global Workspace Analytics, 4.3 million US workers work remotely at least fifty percent of the time. Since 2005, remote working has witnessed an increase of 140 percent.
Not to mention that the current uncertain times have forced a lot of businesses to go completely remote until the health crisis is under control. Now, for workers who solely relied on their desktop computer, such unforeseen problems can hamper productivity.
But, the fortunate news is that you can enable and use remote desktop! At least if you have Windows 10.
Table of Contents
What is a Remote Desktop?
Windows 10 remote desktop is a feature built into the Windows 10 software that allows people to access their desktop remotely. In other words, while your PC might be at work and you might be at home, you can use this feature to access all items on your desktop.
This can be done through the Remote Desktop Protocol, or RDP, a feature of Windows 10. Conventionally, RDP can be accessed through the control panel. But, now, you can do so, in much fewer steps, via accessing your computer settings.
Option 1: Enabling RDP via Settings
Here is how you can enable the remote desktop on Windows 10 feature, using Settings.
- Go to settings and then click on the Systems button.
- Proceed further by clicking on the Remote Desktop tab.
- You will see an “Enable Remote Desktop” toggle switch. Turn it on.
- Click confirm
With these simple steps, you have enabled the RDP feature. Now, you can easily connect to your PC, either via the RDP app or by using the built-in RDP feature. It is recommended that you use the app for smooth performance.
Additional Tips
While the process of enabling remote desktop for Windows 10 is very straightforward, there are a few additional things that you might come across.
1. Automatically Enabled Features
For instance, when you enable the feature, automatically, the “Keep my PC awake for connection when it is plugged in” and “Make PC discoverable on private networks” will be enabled. This is done to make sure that the PC delivers uninterrupted remoteness. You can choose to disable either of the options if you deem them unnecessary. However, it is advised that you don’t do so.
2. Advanced Settings
If you wish to further customize the experience, you can visit the “Advanced Settings” page. Here, you will find various additional options, which help in further securing the connection.
For instance, you can enable the feature that requires computers to first use Network Level Authentication and then connect.
What will this do? Well, this will guarantee that the connection between the desktop and remote devices is secure. Before any device is connected to the desktop, it will need to be authenticated, thereby reducing the chances of data breaches and hacking.
3. Router Configuration
In the Settings page, you will also find an option for “Current Remote Desktop Port.” This option can be used to configure the router to further allow remote connections that are not already part of the network.
In case you stick by your original device and don’t plan on making any changes, ensure that the port number is 3389.
Option 2: Enabling RDP via Control Panel
If you find using the Setting route a tad too easy and wish to try a slightly more cumbersome method, you can always resort to the conventional method of enabling remote desktop on Windows 10. This includes using the Control Panel. Besides, it is always safe to know all methods of any given solution!
Here is a run-down of how you can enable remote working via the Control Panel:
- Access the Control Panel and go to the “System and Security” tab.
- Within the “System” section, you will find a button that says “Allow remote access link,” click on it to proceed.
- Within the “Remote Desktop” section, you will find a button that says, “Allow remote connections to this computer.” Click on it.
- Finally, click “Apply,” followed by “OK.”
Things to Remember
Note that while in the Settings function, you have the choice to either enable Network Level Authentication or not, this is not the case when using the Control Panel. This is because here, the option automatically gets selected by default.
Note that this is a feature that should be enabled regardless. Hence, this difference does not mean that the Settings method is better than the Control Panel method.
The good thing about the Control Panel method is that it can be used to allow remote desktop functions in Windows 7, 8.1, and 10. On the other hand, the Settings method is only available for Windows 10 and beyond.
Combine Remote Desktop with Cloud Services
While we are on the subject of remote working, another essential tool to use is the various cloud services available. This allows you to access your files, regardless of which device you are using and where you are accessing it all from.
However, most cloud services have a storage limit unless you pay for more space. Still, it is a useful tool to have in today’s landscape.
Here are some of the most popular cloud service tools:
- Google Drive
- Dropbox
- One Drive
- Sync
- pCloud
Enable and Begin Working Remotely!
Even if you prefer solely working on your desktop, always have the remote working feature enabled in it. This will allow you to deliver your work, regardless of unforeseen circumstances and issues. Use either the Settings or Control Panel to access the feature and voila you can begin working remotely.
Author’s Bio:

Andrea Bell is a blogger by choice. She loves to discover the world around her. She likes to share her discoveries, experiences and express herself through her blogs. You can find her on Twitter:@IM_AndreaBell